Saturday, January 12, 2019

Recover GRUB Boot Issue in CentOS 7

Recover GRUB Boot Loader in CentOS 7

1. On the first step, download the latest version of CentOS 7 ISO image and burn it to a DVD or create a bootable USB stick. Place the bootable image into your machine appropriate drive and reboot the machine.
While the BIOS performs the POSTs tests, press a special key (Esc, F2, F11, F12, Del depending on the motherboard instructions) in order to enter BIOS settings and modify the boot sequence so that the bootable DVD/USB image is booted first at machine start-up, as illustrated in the below image.
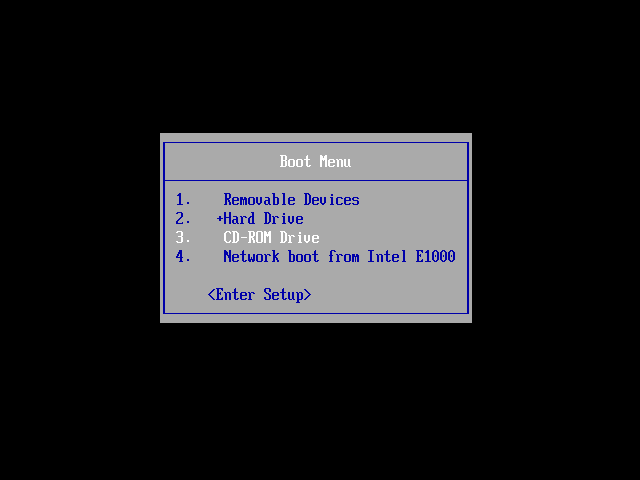
System Boot Menu
System Boot Menu
2. After the CentOS 7 bootable media has been detected, the first screen will appear in your machine monitor output. From the first menu choose the Troubleshooting option and press [enter] key to continue.
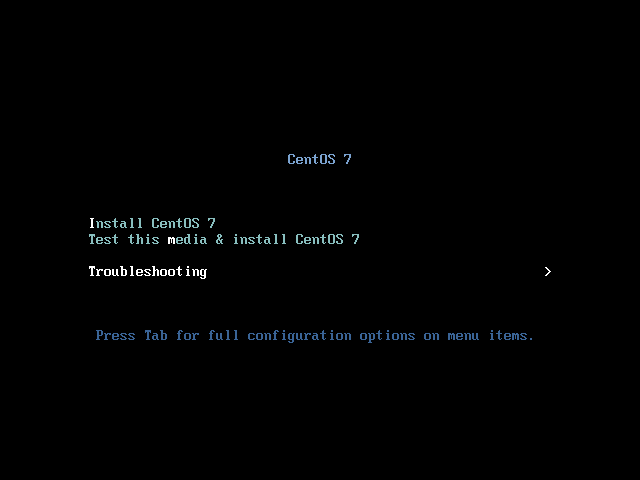
Select CentOS 7 Troubleshooting
3. On the next screen choose Rescue a CentOS system option and press [enter] key to move further. A new screen will appear with the message ‘Press the Enter key to begin the installation process’. Here, just press [enter] key again to load the CentOS system to memory.
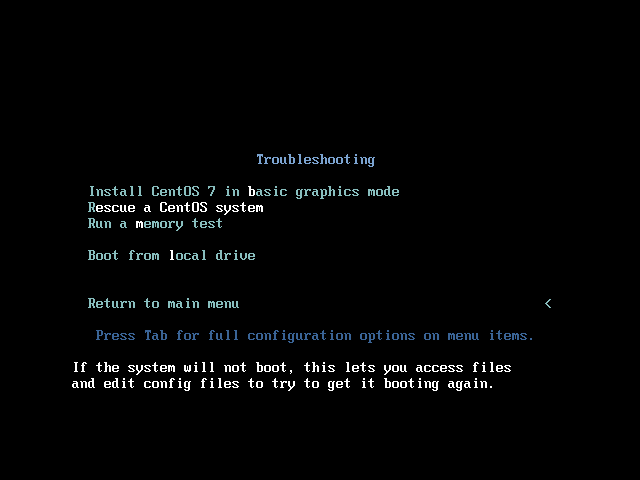
Rescue CentOS 7 System
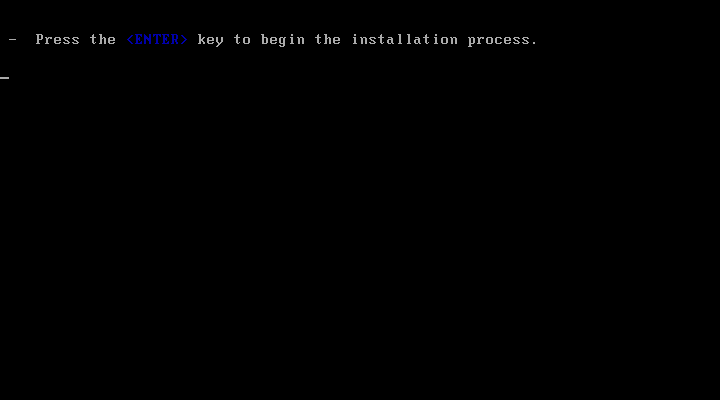
Rescue CentOS 7Process
4. After the installer software loads into your machine RAM, the rescue environment prompt will appear on your screen. On this prompt type 1 in order to Continue with the system recovery process, as illustrated in the below image.
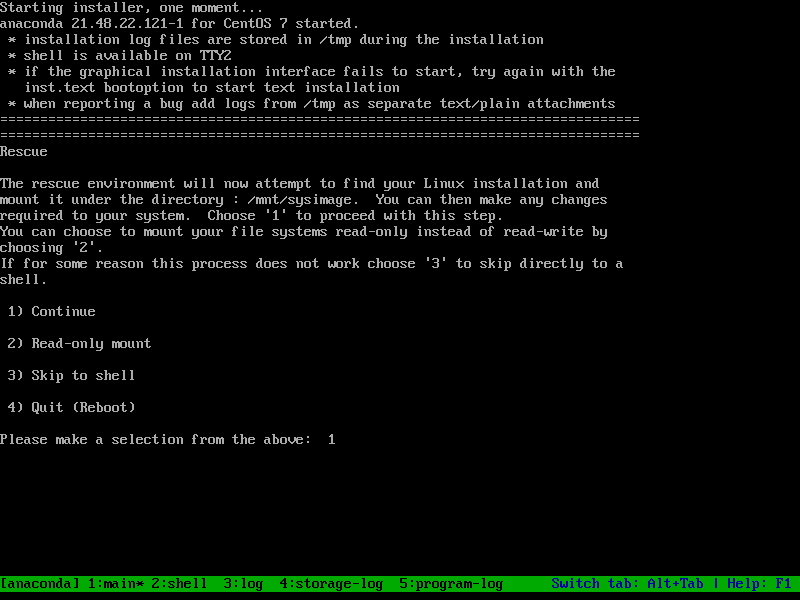
CentOS 7 Rescue Prompt
5. On the next prompt the rescue program will inform you that your system has been mounted under /mnt/sysimage directory. Here, as the rescue program suggests, type chroot /mnt/sysimage in order to change Linux tree hierarchy from the ISO image to the mounted root partition under your disk.
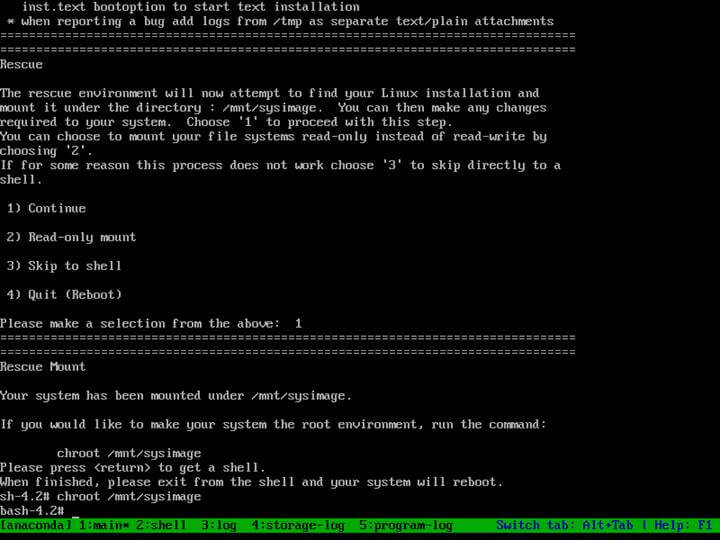
Mount CentOS 7 Image
6. Next, identify your machine hard drive by issuing the below command in the rescue prompt.
# ls /dev/sd*
In case your machine uses an underlying old physical RAID controller, the disks will have other names, such as /dev/cciss. Also, in case your CentOS system is installed under a virtual machine, the hard disks can be named /dev/vda or /dev/xvda.
However, after you’ve identified your machine hard disk, you can start installing the GRUB boot loader by issuing the below commands.
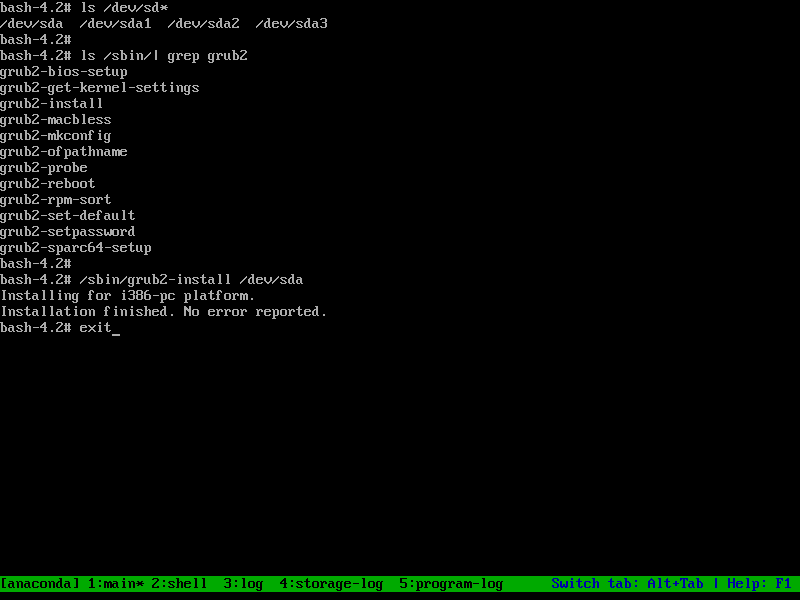
# ls /sbin | grep grub2  # Identify GRUB installation command
# /sbin/grub2-install /dev/sda  # Install the boot loader in the boot partition of the first hard disk
Install Grub Boot Loader in CentOS 7
7. After the GRUB2 boot loader is successfully installed in your hard disk MBR area, type exit to return to the CentOS boot ISO image tree and reboot the machine by typing init 6 in the console, as illustrated in the below screenshot.
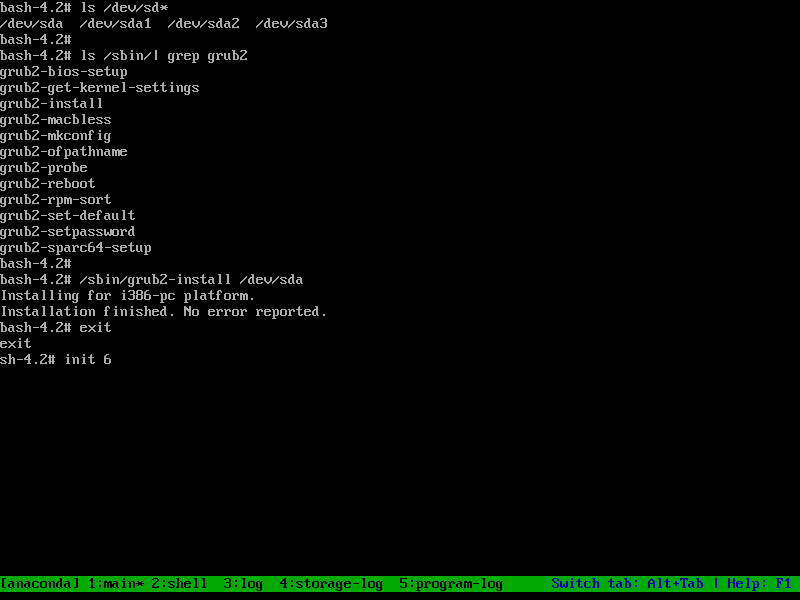
Exit CentOS 7 Grub Prompt
8. After machine restart, you should, first, enter BIOS settings and change the boot order menu (place the hard disk with the installed MBR boot loader on the first position in boot menu order).
Save BIOS settings and, again, reboot the machine to apply the new boot order. After reboot the machine should start directly into the GRUB menu, as shown in the below image.
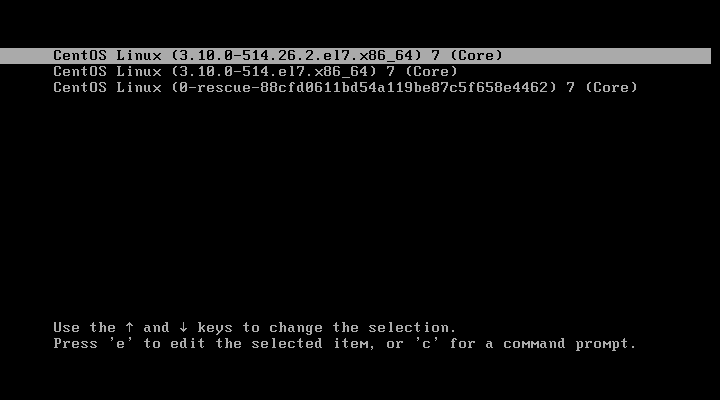
CentOS 7 Grub Menu
CentOS 7 Grub Menu
Congratulations! You’ve successfully repaired your CentOS 7 system damaged GRUB boot loader. Be aware that sometimes, after restoring the GRUB boot loader, the machine will restart once or twice in order to apply the new grub configuration.

Recover Root Password in CentOS 7

9. If you’ve forgotten the root password and you cannot log in to CentOS 7 system, you can basically reset (blank) the password by booting the CentOS 7 ISO DVD image in recovery mode and follow the same steps as shown above, until you reach step 6. While you’re chrooted into your CentOS installation file system, issue the following command in order to edit Linux accounts password file.
# vi /etc/shadow
In shadow file, identify the root password line (usually is the first line), enter vi edit mode by pressing the i key and delete the entire string in between the first colon “:” and the second colon ”:”, as illustrated in the below screenshot.
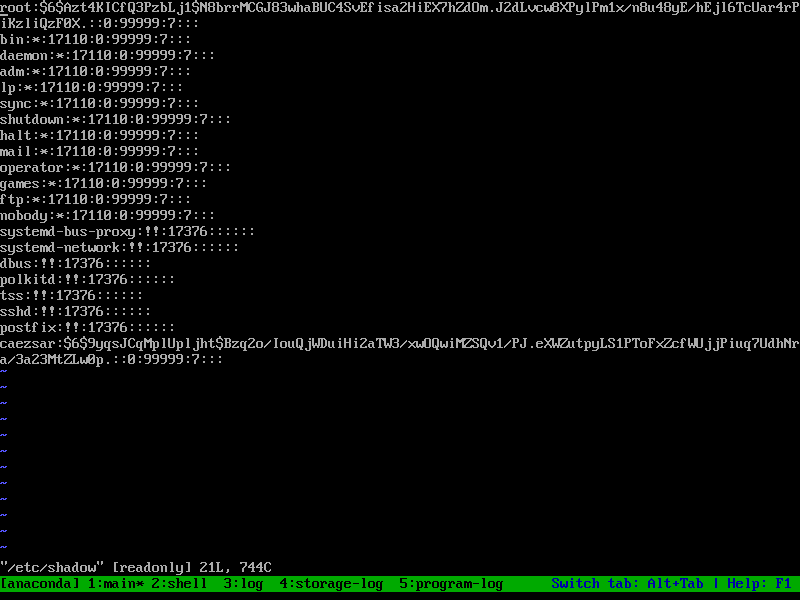
Root Encrypted Password
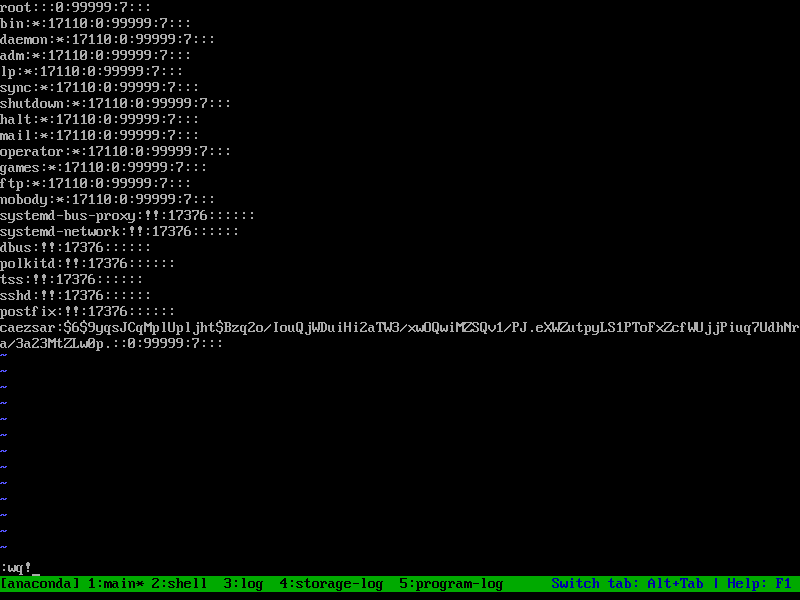
Delete Root Encrypted Password
After you finish, save the file by pressing the following keys in this order Esc -> : -> wq!
10. Finally, exit the chrooted console and type init 6 to reboot the machine. After reboot, login to your CentOS system with the root account, which has no password configured now, and setup a new password for root user by executing the passwd command, as illustrated in the below screenshot.
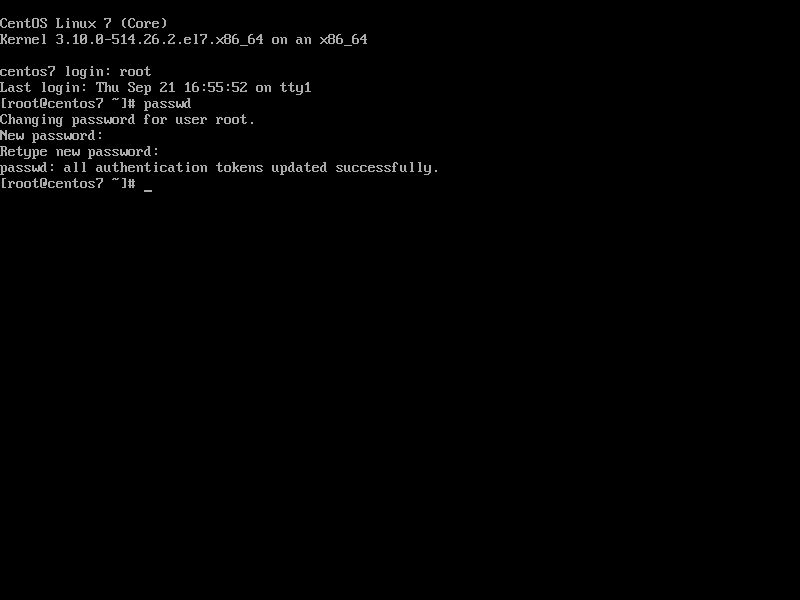
Set New Root Password in CentOS 7
That’s all! Booting a physical machine or a VM with a CentOS 7 DVD ISO image in recovery mode can help system administrators to perform various troubleshooting tasks for a broken system, such as recovering data or the ones described in the tutorial.

Linux Boot Issue Fix

Learn 5 Simple Tips to Fix Booting Issues in Linux

As for many systems, you can use it every day but it can happen that for some reason, your system doesn't boot and you need to know how you can do in these situations. Some Linux distributions don't offer a safe mode and automatic repair tools but you can see recovery mode which provides some options that keep your files and can repair the problem. There is also another possibility by using a Linux live CD or USB which will help to use tools or commands.

1) Repair Grub2

Ubuntu and many other Linux distributions use the GRUB2 boot loader. If GRUB2 breaks for example if you have installed Windows after installing your Ubuntu or overwrite your MBR, you won’t be able to boot into your Linux system. As GRUB 2's ability to fix boot problems has greatly improved over the original GRUB bootloader. I will show you how to repair your GRUB 2 boot issues and specific instructions on how to use the GRUB 2 terminal.
You should use a liveCD. When you will boot in the live mode, then open the terminal and type the command below:
# update-grub2
Generating grub configuration file ...
Found linux image: /boot/vmlinuz-4.10.0-19-generic
Found initrd image: /boot/initrd.img-4.10.0-19-generic
Found memtest86+ image: /boot/memtest86+.elf
Found memtest86+ image: /boot/memtest86+.bin
done
Now you can restart your system. If the operation is not resolved, boot in liveCD mode and install boot repair packages as below
# apt-add-repository ppa:yannubuntu/boot-repair && apt-get update
# apt-get install -y boot-repair && boot-repair
When the boot repair will start, you will follow the step below
Use the recommended repair. The operation can take several minutes so be patient. Follow the given steps. After this, you can restart your system.

2) Reset a login password forgotten

It can happen that after the boot process, you can't log into your system because you have forgotten your password or maybe you have changed your keyboard language and the input doesn't match the characters you know. The only possibility is to reset your password.
To reset your password, boot in recovery mode and access to the terminal. Enter the command below:
# mount -o remount,rw /
The command above mounts the root partition in read/write mode. Now change your password
# passwd username
Enter new UNIX password: 
Retype new UNIX password:
If you have SELinux, enter the command below to update its parameters
# touch /.autorelabel
Now you can normally reboot your system and enter the new password

3) Unable to log in: fail to start session

It can happen on the reboot that the screen of your system goes black and soon after that the login screen comes back. This problem can appear because your graphic environment encountered some problems during a package installation or an upgrade. Or it is probably because there is little space on your machine or an issue with LightDM or Xauthority.
To resolve the issue, type the Ctl-Alt-F1 and got the terminal login. Now enter the command below:
# dpkg-reconfigure lightdm

4) View logs system boot messages

The journal is implemented with the jourlnad daemon, which handles all of the messages produced by the kernel, initrd, services, etc. It can help you to see all the errors messages related to the system boot and you can try to resolve it. To see boot-related messages from the current boot, use the -b switch:
# journalctl -b
-- Logs begin at Mon 2017-06-26 16:27:12 WAT, end at Mon 2017-06-26 19:18:50 WAT
Jun 26 16:27:12 ubuntu-pc kernel: Linux version 4.10.0-19-generic (buildd@lcy01-
Jun 26 16:27:12 ubuntu-pc kernel: Command line: BOOT_IMAGE=/boot/vmlinuz-4.10.0-
Jun 26 16:27:12 ubuntu-pc kernel: KERNEL supported cpus:
Jun 26 16:27:12 ubuntu-pc kernel: Intel GenuineIntel
Jun 26 16:27:12 ubuntu-pc kernel: AMD AuthenticAMD
Jun 26 16:27:12 ubuntu-pc kernel: Centaur CentaurHauls
Jun 26 16:27:12 ubuntu-pc kernel: Disabled fast string operations
To see the journal from the previous boot, use the -1 relative pointer with the -b flag
# journalctl -b -1
You can have some issues due to applications. Journald makes easy to take advantage of the advanced features of the journal and to do extensive analysis and relational debugging of different application components.

5) Boot Error on Console

Sometimes it happens on reboot the system gets panic or some error message like "init not found" is displayed, preventing from proper booting, then as a first step you can try pass init=/bin/bash (Grub boot loader) or linux init=/bin/bash (if Lilo boot loader). This will launch you straight into a Bash shell prompt. Then you can remount "/" file system and check /var/log/messages for any error. You can use the below command to remount "/" as read/write. Kernel panic could be because of a bad cpu or motherboard or bad memory.
# mount -o remount,rw /
If the above steps does not work, then next option is to
1) Boot from the Linux First CD (boot CD).
2) Type "boot rescue" at Linux boot prompt.
3) After the bash shell prompt show up, type "chroot /mnt/sysimage".
a)  Check for any disk error
# fsck -y /dev/sda2
or
# fsck.ext3 /dev/sda2
Check "fdisk -l /dev/hda" to check how many partitions you have
b) If you use Grub boot loader, type "/sbin/grub-install --root-directory=/boot". If you use Lilo bootloader, type "cd /etc; lilo".

Conclusion

LiveCDs such as Ubuntu or Knoppix do the job of rescue booting just fine, but there are smaller, faster rescue boot disks out there. In such situations, knowing how to edit individual GRUB stanzas, use the GRUB command line but you need to be able to identify the problem. By using these techniques, you can recover from various boot problems and boot into your normal installation.

Saturday, July 7, 2018

ZFS - Create Disk Pools

Once you've installed support for ZFS, you need to create a zpool on which we can store data. This tutorial will cover how to create pools with different RAID levels.
  • singular/basic (no RAID)
  • raidz
  • raidz2
  • raid 0
  • raid 10
For this tutorial, I will be using Virtualbox with fixed size disk images of to emulate physical drives attached to my server.

Update 21st October 2017

After performing some tests, I realize now that creating the pools by specifying disks like /dev/sda and /dev/sdb is somewhat dangerous. Your pool could become degraded or disappear if you plug in another drive and all the letters change. To remedy this, use paths with /dev/disk/by-id/... instead or immediately convert your pool after creation by running:
sudo zpool export [my pool name]
sudo zpool import -d [my pool name]

Also, if your pool does become degraded because of the situation described above, running those export/import commands will fix the situation, even if you have already written data since the pool became degraded.

Single Disk (No RAID)

Substitute sdb with whatever your drive is identified as.
sudo zpool create -f [new pool name] /dev/sdb

The -f prevents the error message from preventing the creation. Be careful when using this as you could overwrite existing pools/partitions.

Multiple Disk (RAID 0)

This will create a pool of storage where data is striped across all of the devices specified. Loss of any of the drives will result in losing all of your data.
sudo zpool create -f [new pool name] /dev/sdb /dev/sdc

Adding Drives

You can add drives to a pool to increase its capacity. Any new data will be dynamically striped across the pool, but existing data will not be moved in order to "balance" the pool.
sudo zpool add [existing pool name] /dev/sdd

Raid 1

To create a RAID1 pool (or mirror), simply add the command mirror when creating or adding drives. For example:
sudo zpool create  -f [new pool name] mirror /dev/sdb /dev/sdc

sudo zpool add [existing pool name] mirror /dev/sdd /dev/sde

RAID 10

Creating a RAID1 pool of two drives, and then adding another pair of mirroring drives as shown above would actually create a RAID 10 pool whereby data is striped over two mirrors. This results in better performance without sacrificing redundancy.
To create a RAID10 array in a single command, simply run:
sudo zpool create [pool name] \
mirror disk1 disk2 \
mirror disk3 disk4

The output of sudo zpool status would show:
  pool: myPool
 state: ONLINE
  scan: none requested
config:

        NAME        STATE     READ WRITE CKSUM
        myPool      ONLINE       0     0     0
          mirror-0  ONLINE       0     0     0
            sdb     ONLINE       0     0     0
            sdc     ONLINE       0     0     0
          mirror-1  ONLINE       0     0     0
            sdd     ONLINE       0     0     0
            sde     ONLINE       0     0     0

RAID Z (RAID 5)

RAIDz is very similar to RAID 5 in which parity is generated and stored in order for the RAID array to be able to gracefully handle a drive failing. This means that only one drive's worth of capacity is "lost" in order to provide redundancy for the entire pool of drives. This means that you lose a lot less capacity than with using mirrors which result in you losing 50% of your storage capacity. However, parity cannot be used for scrubbing like RAID 10 can, and calculating parity for every tile transaction can slow down your IO.
To create a RAIDz pool simply run:
sudo zpool create -f [pool name] raidz /dev/sdb /dev/sdc /dev/sdd

You can't add to a RAIDz pool. If you were to run the command below:
sudo zpool add -f [pool name] /dev/sde

Then you would be creating a RAID 0 array over the raidz pool and the drive you just added. This is best shown by the ouput of zpool status:
  pool: poolz
 state: ONLINE
  scan: none requested
config:

        NAME        STATE     READ WRITE CKSUM
        poolz       ONLINE       0     0     0
          raidz1-0  ONLINE       0     0     0
            sdb     ONLINE       0     0     0
            sdc     ONLINE       0     0     0
            sdd     ONLINE       0     0     0
          sde       ONLINE       0     0     0

RAIDz2

This is much like RAIDz except that two drives will store parity instead of just one. This means that your array can lose any two drives without loss of data. This means it is actually safer than RAID10 where you would lose all of your data if two drives in the same mirror died. Using RAIDz2 over RAIDz makes a lot of sense because the likelihood of losing a drive when rebuilding a degraded RAIDz array, is greatly increased. Thus losing a drive during the rebuild shouldn't be a problem.
To create a RAIDz2 pool simply run:
sudo zpool create -f [pool name] raidz2 /dev/sdb /dev/sdc /dev/sdd 
You need a minimum of 3 drives

RAIDz3

Exactly the same as RAIDz3 except a third drive holds parity and the minimum number of drives is 4. Your array can lose 3 drives without loss of data.
To create a RAIDz3 pool simply run:
sudo zpool create -f [pool name] raidz3 /dev/sdb /dev/sdc /dev/sdd /dev/sde

Mixing and Matching

You may have realized by now that you can mix and match pools together. The pools are always "striped" together creating an effective RAID 0 (although you may need to rebalance/resilver if you added to an existing pool). This means you can combine any number of mirrors and RAIDz pools to create any kind of crazy configuration of your choice. For example, you could run RAID 0 over the top of a RAIDz and mirror arrays.

Pool Balancing

Since ZFS does not have an in-built tool to re-stripe existing data when a drive has been added, I wrote a tool to re-write every file in the pool in order to achieve this. Restriping in this manner results in drives containing an equal share of data, and improves IO. Best of all, this is all done internally, so you do not need to export all of your data and then write it back again like others have suggested.
To use the tool, simply clone the repository and make sure you have PHP installed before running the tool with a path to where your files are kept.
sudo apt-get install php5-cli git -y
git clone https://github.com/programster/zfs-balancer.git
cd zfs-balancer
php main.php /path/to/zfs/pool

Destroying Pools

sudo zpool destroy [pool name]

Conclusion

Now you've setup your storage pools, you probably want to learn the various commands for interfacing with your pool and possibly take snapshots.